Saturday, July 28, 2012

For the Dogs

I have three large dogs. they like to sleep on my couch, they have destroyed two couched in the last 6 years since we have had them. We get a new couch next week and they will not be allowed on this one.  So I am going to make them more comfortable with this great homemade dog bed.  Which bu the way only cost me $1 and that was just for the egg crate inside.

The three destroyers of couches, also known as Mya, Ginger, and Sadie.

The twin size egg crate

The primary cover. Simple white cotton, this is so I will not have to worry about the dogs messing up the egg crate.

Egg crate- folded this is the size of the dog bed

Look Ginger likes it already.

The inside corner of the primary cover. I cut the corners at an angle to make them stay nice when the cover is turned right side out.

The cover on the new bed

Trying to sew up the last open end so nothing can get to the egg crate.

An old fitted sheet, that is going to be the outside cover.

The sheet cut and sewed together. I did an overlapping back so the dogs can't get into the cover.

Finished bed

Ginger loves her new bed :-)

Thursday, July 26, 2012

Fixing to get it done...

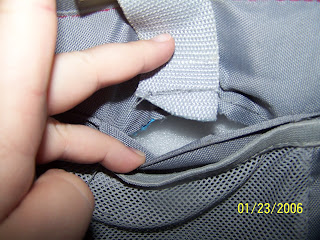
Crafty me is not only about the cool stuff that I can make but sometimes its about the cool stuff that I have that needs to be fixed.  Tonight I am going to fix my lunchbox that I carry to work. The shoulder strap is coming apart from the "box" part and I need to fix it before it gets worse.

Basic tools
needle and thread

The problem :-(

How bad the problem is.

Almost fixed, and look at that great thimble--kept me from hurting my finger.

All fixed.
Yes, I should have used gray thread but I didn't have any and I was not going to buy some for this project !

SO remember, you don't always have to replace something when its broken sometimes is better to just
FIX it.

The whole project took 20 minutes.

Sunday, July 22, 2012

Pickles

This week I tried my hand and making and canning pickles. They turned out pretty good, below are the steps that I took to make and can these great pickles. This is just what I did, PLEASE do not take these as real directions to can anything. I referenced Ball Blue Book guide to preserving (about $8 at WalMart).

Cucumbers
Some green and some yellow. Both varieties were given to my by friends.


Prepackaged mix

Clean Jars

Canning pot, on the stove filled with water

Water and Vinegar waiting to go into the pot.

The canning Bible--full of lots of great information.

Step 1:  Cut your cucumbers. These are done in spears, but I did some slices too.

Make sure you cut off the unusable ends and any bad spots.

Measure the pickling mix

5 cucumber = about 6 jars
This is before I sterilized the jars, I wanted to make sure I had enough jars.

Here you can see the slices (left side) and the spears (in front)

This is the pickling mix in the pot with the vinegar and water, waiting to boil.

This is the pickling mix HOT and ready to be poured on the cucumbers that are waiting in the HOT sterilized jars.

Pickles in the HOT water bath.
I kept them in the bath for 10 minutes

Finally pulled out of the water bath. I put them on a kitchen towel so the HOT jars didn't bust when they touched the cold granite of my counters.
It is OK that the cucumbers floated to the top of the jar, that is what is suppose to happen.

Look close you can see the top has popped. They are good to take the ring off and store for a year (according to the Ball Book).

I had one jar that did not seal properly, so it went into the fridge the next morning and we have been enjoying them this weekend. You are suppose to let the pickles sit for at least 24 hours before you enjoy them, but the longer they sit the more pickled they get. I did not open the jar that didn't set until lat Friday night, so they were nice and pickled. Tomorrow is the real test, a jar is going to work for everyone to sample.

Saturday, July 7, 2012

Sarong its Right

So I am heading to a pool party this afternoon and I wanted something very light and fun to wear. I went online and found simple directions to make myself a fun sarong. 
The basic directions for the sarong are:
1. Use 2-3 yards of fabric (depending on your size) I used about 3 yards.
2. Wash and dry with out fabric softener.
3. Iron.
4. Hem all the way around all 4 sides.
5. Tie into sarong. (I like this website for directions to tie the sarong.  http://www.fairwindssarongs.com/howtotiesarong.html)
This is the fabric I choose. It is about 3 yards.

I folded the rough edges over the first time and ironed them flat.

Then folded it over again and ironed it flat.

Then sew the edges.

Another fashion show.

Look close at the top, the knot when fluffed right looks like a bow.

Such a quick and easy project to add some style to your wardrobe--and if you are really daring, pair with a light sweater and you have a cute dress to wear to work.

Pants to Skirt

Time for me to get started with all of the projects that I keep putting off. Today I finished a skirt that was made from a pair of pants that didn't fit anymore. Now it fits and will really nice to wear to work on Monday.
This is how I did it. I tried to remember to take pictures along the way.

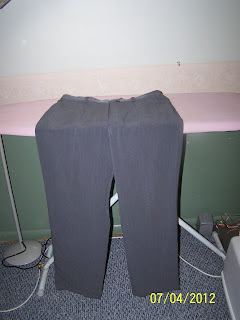
What I started with, a pair of grey pants,

I undid the cuffs on both legs.

Cut up the inseam on both legs, as close to the original seam as possible.

Cut through the crotch, so you have a completely open bottom.
Because I needed to make the skirt big enough to fit me I also cut up the seam in the seat of the pants, including the waist band.

This is what the back looks like when it is opened up.

This is the pants laid open.

After you open the seams on the legs, if the pants fit before then all you have to do is sew the front of the leg up, and the back of the legs up.  At this point you should have a long skirt, try it on and cut it a little longer than the length that you want the skirt. Add a hem and you get the finished project below.


This is the panel that I added to the skirt, and the hem of the skirt.

The finished skirt.

And finally a fashion show of the finished product.